Archive
HyperV 2012 R2 preview
Its been over a year now and as soon as Microsoft put out the newest version of HyperV (Windows Hyper-V 2012 R2) I decided to give it a try. There was a new WMI namespace that promised to bring a heap of features to HyperV that would rival the other virtualization platforms and I was eager to get them working in the Lab. Unfortunately it might have been a bit premature but more on that later.
After reinstalling (MS suggests it and I had an error when I tried to upgrade from my HyperV 2012 hosts so I was forced to install a fresh copy),

After I installed the RSAT for Windows 8.1 I encountered some problems connecting to the HyperV options from my Windows 8.1 workstation using the HyperV manager but I was not immediately alarmed. I also noticed that I could not connect to my older system (Windows HyperV 2012) and chalked it up to the new WMI Namespace issue (Windows deprecated the older V1 namespace in the new versions of Windows 8/2012 R2).
After following the lessons learned in the previous post here I was able to create my new Cluster using the following powershell command on one of the HyperV hosts.
‘New-Cluster -Name JSI-1 -Node HyperV1,HyperV2 –NoStorage’
I could then create my new VMs and ISO directories on the Clustered Shared Volume and start recreating my VMs.
‘New-VM -Name SW1 -Path C:\ClusterStorage\Volume1\VMs –Memory 512MB –SwitchName “New Virtual Switch”’
After all my vms directories were created I uploaded my vhd files to add to my VMs. (I decided to convert them to vhdx because they continue to use this new resilient image format introduced in 2012).
‘Convert-VHD –Path C:\ClusterStorage\Volume1\VMs\SW1\SW1.vhd –DestinationPath C:\ClusterStorage\Volume1\VMs\SW1\SW1.vhdx’
I was now ready to add my newly created vhdx files to my existing VMs and finally to spin them up.
‘ADD-VMHardDiskDrive –VMName SW1 -Path C:\ClusterStorage\Volume1\VMs\SW1\SW1.vhdx’
and finally let’s setup the dynamic memory feature like so…
‘Set-VMMemory –VMName SW1 -DynamicMemoryEnabled $True -MaximumBytes 1GB -MinimumBytes 256MB -StartupBytes 512MB’
Now let’s start that bad boy and get it back online…
‘Start-VM –name SW1’
(Here are the all of the commands for HyperV now for 8.1 and 2012 R2)
All is well again – well maybe not…
At the time of this writing there were all types of connection problems with the GUI tools. Windows 7,8,8.1 didn’t connect properly and even the Cluster Administrator with a newly installed Windows 2012 R2 server didn’t fully function. Powershell on the Hyper-V box was the only thing that worked properly – thank god for Powershell.
Maybe the GUI tools will mature after I write this article…
I mean after all it is Windows right 
Using Kaseya to deploy LogMeIn
Sometimes the VNC connection with Liveconnect just won’t work – probably due to poor bandwidth or maybe a plugin issue so I wanted to document a simple process of using Kaseya to deploy the free/paid version of LogMeIn to your agents so you have another method of connecting remotely.
I created a script that will download a customized version of LogMeIn and run it as the system to silently install. You can run it as a procedure to install on your agents which can run on the bandwidth challenged systems.

First you have to create a customized package using your LogMeIn account and download the executable version (this process is outside the scope of this document).
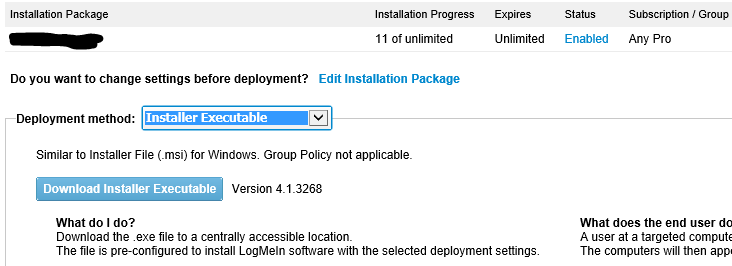
Next you use the script (above) to send the file, wait for it to be downloaded, run the installer, delete the install file and update the procedure log (we added a pause to wait for the installer to complete before we try to delete the file).
Finally you upload it to your Kaseya server and modify the script to pull the new customized LogMeIn file down to your agents and that is it. No more asking clients to run remote control programs so you can connect – if the machine has a Kasey agent on it then you can run this procedure to install LogMeIn.
You can use Kaseya procedures to so almost anything – we run SQL scripts, batchfiles, WMI scripts, the list is almost endless. If you have an idea for a script or have other scripts that you would like to share – feel free to comment below.
I hope you find Kaseya as powerful as I do and learn how to make the power of Kaseya work for you.
Using VPro with the Kaseya Portal
My Observations of the VPro feature in Kaseya. If you have a machine and would like to enable the VPro feature then review my musings and follow the steps at the end of my post. If you need some help you can contact me and I will review it with you.
(You must be onsite in order to activate this – you will also need a USB key)
I wanted to detail my experience with Kaseya and the VPro feature within it. If you are like me, you might have heard of the feature that Intel has put into their CPUs but that might be all.
I am familiar with remote features like Drac, ILO, etc. in servers but the idea of remote controlling a workstation is so exciting that it opens all sorts of thoughts surrounding management without having to be in front of the keyboard. I especially love the ability of running a disk management tool to help maintain or even fix hard drives that are about to go bad. These tools can run for days and arriving to load it once and asking a local user to tell you when it finishes isn’t always convenient.
Starting with version 6.x, VPro has VNC based firmware installed in the chip – it only needs to be activated in the BIOS or by a special thumb drive – This is where the Intel Activator Wizard comes in. You can configure a standalone password for the AMT to be used by remote control and for any other AMT events. Failing to do so will allow you to connect but the screen is prompting the user for a code that is not visible when you are remoted in. In some cases I have seen versions that cannot be enabled remotely when you detect and then try to enable VPro on certain versions.
You need to have the Intel Management drivers loaded on a machine that has the Kaseya agent installed to be able to detect/enable VPro and it comes from the factory disabled. If the drivers are loaded on an OS and it is running then you can detect and perhaps enable it remotely using Kaseya. The connection topology starts by setting up a vpro proxy (this should be a publically available IP – maybe even one to one NAT) that should be available on the same subnet as the machines you are using with vpro. You map a port through to that vpro proxy machine and it then tries to open the connection to the VPro system on your behalf. You can use any port number you wish – it only requires one however you can only remote one machine at a time.
If you are able to connect through your proxy you may get a screen that asks for a 6 digit passcode. This is the user consent page – it will be asking the user for his/her consent while you try 3 times to ‘guess’ the password. This can be disabled when you use the SCS from above. If you have mistakenly provisioned it using the Kaseya portal you cannot use the AMT configuration utility again – it will state nothing to do. You must disable it in the Kaseya portal and then run the AMT program on a thumb drive on the machine you wish to reprovision in order to have control again.
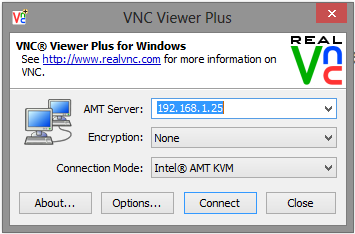
Picture 1
You can download a program called VNC Viewer Plus to verify the connection to the AMT. You should be able to login as admin and use the password you set in the AMT configuration like the picture (attached picture 1).
You must have the ME drivers already installed to use this utility. If you need the Management drivers (your OS did not already have them installed) you should download them from Intel.
The steps I used to activate VPro are as follows;
- Use Cntrl + P to access the MEBX bios when booting up your PC.
- The default password is admin – Set the password to something you can use (you must use a complex password and the remote KVM will only accept 8 characters so please use something similar to p&ssw0rd)
- Boot the computer and insert the thumb drive with the AMT utility expanded onto the drive (http://software.intel.com/sites/default/files/m/d/4/1/d/8/IntelAMT_config_utility_Rev0.5.0.3.zip)
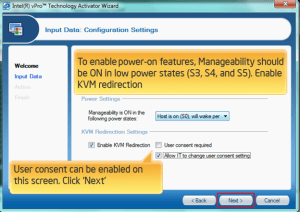
Picture 2
- Run the Activatorscript as Admin and set the password (again if you do not want/need to change it) then enable the following (see attached picture 2)
- After you save the config onto the thumb drive you can reboot the machine with the drive still in it. You should see a screen asking if you want to update the provisioning of the ME (or something similar)
- After choosing ‘Yes’ your AMT should now be enabled in the Kaseya portal.

The power of Automation
From the beginning of time (well mine anyways) one of things I really really enjoyed is making stuff happen by itself. I loved to see helicopters fly or cars roll away under there own power. Fortunately I discovered electronics at an early age and my interest turned to all things electric. Finally I became interested in computers and well that brings me to my current post.
A while back I tinkered with home automation but that was hard to source all these products and I really couldn’t afford them but now that virtualization is here you can have multiple computers all running on the same physical machine. This is a breeding ground for automation. Along comes this product called Kaseya and for me the rest is history.
I recently became involved in the Kaseya project in my company and I absolutely love this product. Most people that work with it say it’s great when it’s working and a real pain when its not and I would have to say that I feel the same way.
Occasionally I come across some ideas from others and can actually turn out some automation of my own that can help manage the computers of my own lab or of my companies managed contracts. Recently we tackled the issue of disk corruption in computers. For anyone in our line of work you might be familiar with running chkdsk on a system volume and how often that is run. It should be done as a normal preventative measure but it requires exclusive use of the drive so it can only be done during the boot cycle. This means that you or your clients are usually without a working computer while it runs it’s course. Something you might think could take minutes can sometimes take hours and once you start it you can’t really stop it.
We used the power of Kaseya scripting to put together a preventative process to test for the need to fix the system drive and can now schedule it during off hours. This script will test the system drive and reboot the server if it finds errors that need to be repaired.
Just one of the many features we employ at Manawa Networks.
Backing up with Hyperoo 2 is better than ever
I wanted to start the new year off by checking out my backup solution options. I have a license for Hyperoo and was able to contact support to get that license upgraded for the new version 2.0.
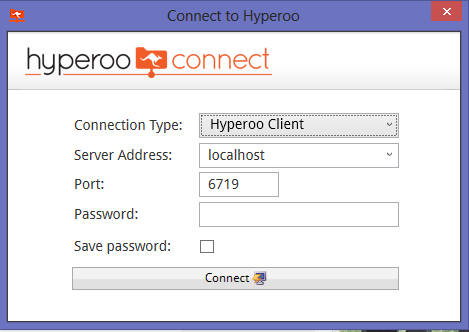
I love the new interface – it allows the user to connect to the client as well as the server component. (The server component is used to take the backup and the client version is used to send the backup). It is the same component that is started on the Hyper-V core OS from the “C:\Program Files (x86)\HyperooSoftware\Hyperoo 2.0\” directory using the command HyperooServerManager.exe (so be sure to also install the Manager component on your Hyper-V hosts).
You can now open the client console on your server without needing to open a remote desktop session to your Hyper-V server. You type the remote name of your server and click on the backup task that is active. When you click on the console tab you can choose ‘Backup Status’ to see a progress bar. (It would be nice to be able to see a projected finish time based on how many files are left). 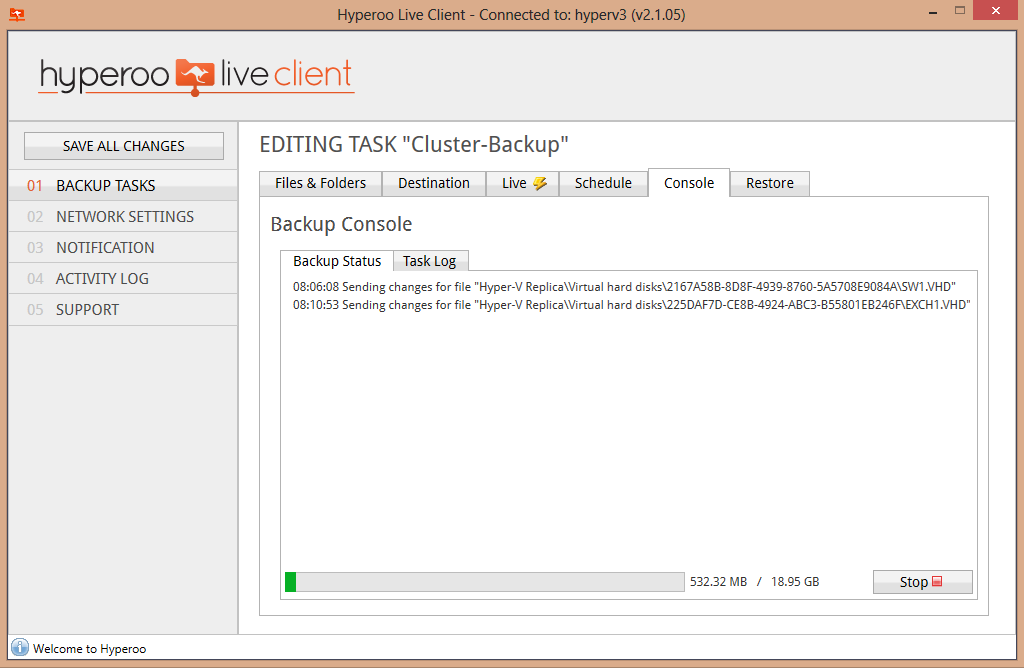 I don’t like the fact that when you click off of the status window and return after viewing other options that it only shows the current item.
Restoring a vm is now easier by connecting to the client and using the restore applet.
I would like to try the Live version to see how much easier it is to restore Clustered files but that will have to wait.
Cluster Aware Updating really works!
One of the things that can set apart a business is failover technology – lets’ face it stuff happens. Hard drives develop errors, power fails and your computers just stop. As a MSP I can wait to find out about it a few minutes after it does from my clients (who are not very happy because it failed) or I can find out with extensive monitoring that is constantly checking the hardware/software environment but I can’t really do anything about it unless we configure additional hardware/software to kick in when it happens. Until now those setups were large and expensive and involved clustering file systems, multiple servers and quite frankly would require dozens of man-hours to setup and maintain. Disaster recovery involved thousands of dollars per month to have on hand just in case you needed it.
Along comes Windows 2012 Hyper-V with features that help bring the cost of having the benefits of this technology to a small business for a few thousand dollars per year!
Enter Cluster aware updating – this new feature of Hyper-V allows any small to medium enterprise (SME) to implement two Hyper-V servers with enough memory to run all of the virtual servers they need to operate their business (Exchange, SharePoint, File server, SQL, etc.) Most systems come with redundant hardware (power supplies, hard drives, etc.) so a single point of failure is all but eliminated but what about updates and maintenance? If you want to keep everything running or even just want to test your recover options in the event of failure you need to fail over your live system with as little or no downtime right?
Let’s looks at an example below

Cluster Aware Updating initiates an update. It is determined that one of our Hyper-V machines needs an update so it is downloaded. CAU migrates the VMs off to another member of the cluster.

Next is a screen of the CAU progress as it begins to apply the update
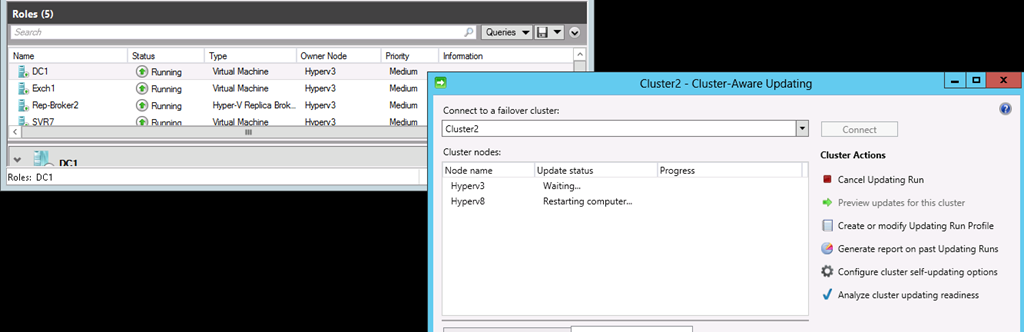
After the update is applied CAU issues a restart of that member of the cluster.
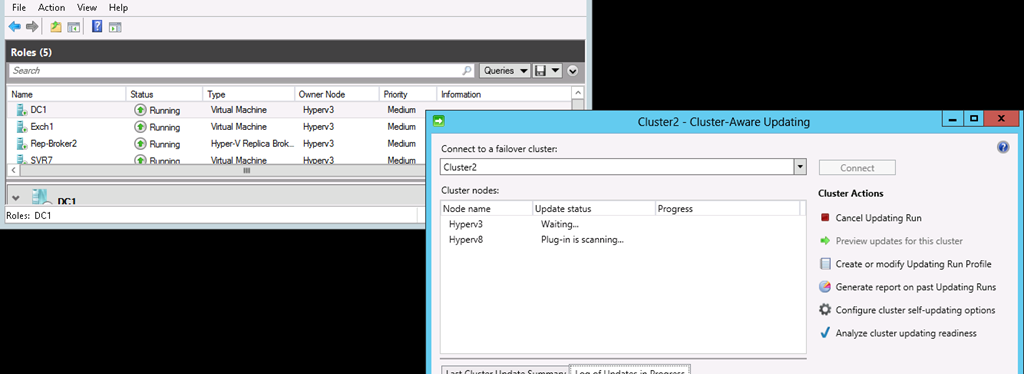
Once the restart is complete for the patched Hyper-V machine all members are scanned again for patches

Migration back to preferred machines occurs once all Hyper-V machines have been updated and restarted.
All of this can happen automatically just as you schedule Autoupdates for all of your desktops. There is no need for an administrator to manage each patch and to manually apply them. You can still have little or no downtime and have complete fault tolerance for your SQL and Exchange databases which means no interruption for your business.
Now did I mention that it’s all free! Not one maintenance fee, not one software license or add-on cost associated with this solution – all you need are a few machines to run Hyper-V and your finished. Now I would like to see VMware come up with something that tops that!
New Hyper-V Replica feature makes migration easier
I recently had a problem when I upgraded to Hyper-V 2012 with an older test machine (DC5750) that just wouldn’t work with the new kernel. I decided that it was time to create a new Cluster and dreaded the Import/Export that I was going to have to do. I thought this would be a great time to test the Replica feature. Not only will it allow you to replicate VMs onto another Hyper-V machine for disaster recovery but it will also allow you to replicate to another cluster!

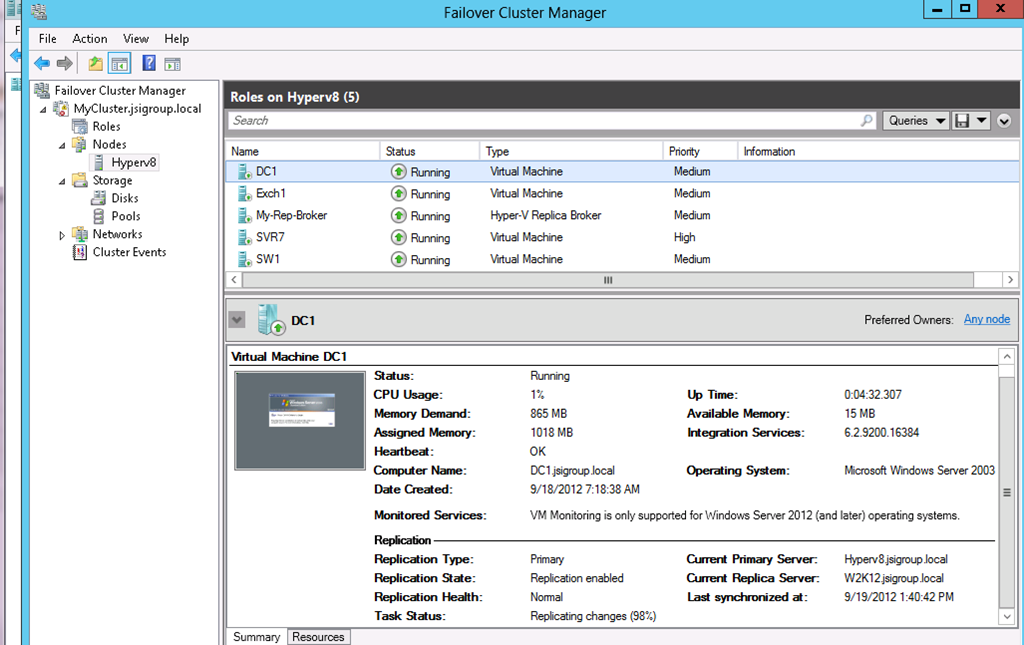
Here I show you a snap of the Failover Cluster Manager with both of my clusters (MyCluster is the old cluster I am migrating from – you can see Hyperv8 is the only node and Cluster1 is the new one). You have to create a Replica Broker for Replications to occur on a cluster and I have now setup SW1 to replicate to the new cluster. Now I have all four of my VMs configured to replicate changes ever 5 minutes and can take my old cluster offline when I am ready. It will require me to start the new VMs on the new cluster but I can do this at any time.
Hyper-V Replica keeps a log of any changes to these VHD files and replicates those changes to the other VM. This results in a fairly quick time to recovery if any issues should ever happen to your main cluster. Initial replication can even be done offline to a disk and imported into the other site so bandwidth issues and large VMs are not a problem. You can even do all of this with a single NIC!
I am not happy that at the time of this writing they still do not have any management upgrades for Windows 7 (you will need to have a full version of Windows 2012 or Windows 8 to manage these new features) but I like the fact that the old Hyper-V management application will still allow you to work with your VMs.
Windows has hit this one out of the park and has challenged both Citrix and VMware to step up to the plate for most SMBs. I hope you find it as robust as I do and consider implementing your own CFS.
Setting up your 2012 Hyper-V Cluster
I decided to undertake an upgrade of my Windows 2008 R2 Hyper-V cluster this week and assumed that it would be easy (it wasn’t). After getting it up and running there were a few lessons I learned that I wanted to share with my readers.
If you haven’t already read my previous post regarding getting your cluster up and running with the older 2008 R2 version here it is. Reviewing it will help expose some of you neophytes to the process of using clustered storage. There is a new feature available with the new Hyper-V 2012 that is called Replication and I first thought this would work for my application but it doesn’t automatically start the VMs (which can be a good thing but more on that in another post). You still need to get shared storage working so I began by reusing my 32-bit version of Open E-DSS 6 (http://www.open-e.com/products/open-e-data-storage-software-v6/).
It turns out that trying to mount the iSCSI shares proved too difficult for me to simply reuse so I had to format my Clustered Shared Volume (CSV1) so I could use it again with the new Hyper-V servers.
To add the storage to a newly installed version of Hyper-V 2012 I had to type
‘netsh firewall set service type = remoteadmin mode = enable’
on the console to enable remote management from a Windows 2012 server. (The server manager won’t connect to Windows 2012 from Windows 7 – I think you must be using Windows 8). I then typed powershell to begin a shell on the hyperv box. 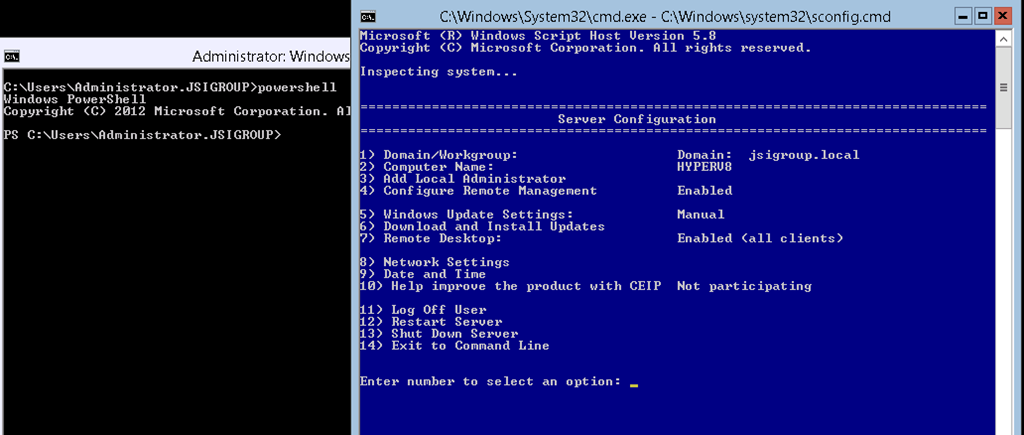
‘Import-Module servermanager’
followed by
‘add-windowsfeature Failover-Clustering, MultiPath-IO’
to install the features. This is even easier than dism on the old server.
Next we run ‘iscsicpl’ to add the iSCSI node for storage. This is my DSS box with a RAID 5 SCSI array that has 5 36G drives in it. 4 drives in a 100G array with one hot spare.
Next I exit out of powershell by typing ‘exit’ and then run ‘diskpart’ to format the drives (on the first machine – I only cover the data drive below but you will need to configure the Quorum drive if you are setting everything up for the first time). This puts you in a terminal style windows so we type commands on a new line and hit enter to run them. To see all of your existing disks you can type ‘list disk’.
‘select disk ?’ (replace ? with whatever the new disk number for the iSCSI disk is)
‘create partition primary’ (this will create a new partition on the drive you selected above)
(if it gives you a read only error you can force it off by typing ‘attr disk clear readonly’ first and then repeat the command to create the partition.
format fs=ntfs label=”CSV1” quick (this will format the partition as a NTFS filesystem so that you can use it as a clustered file system. Type exit to leave the diskpart shell.
If you want to use some powershell cmdlets for configuring the vms or the cluster options you will need to add a few additional roles and features. I have outlined all of mine below.

I have chosen to configure storage and the hyper-V options from my Windows 2012 server with the GUI enabled. This also gives me the option of configuring the Cluster features remotely too because I do not have a working Windows 8 desktop yet.
If you want to use the Cluster Aware Updating that comes with Hyper-V 2012 there are a few things that must also be done (aside from adding those features above).
To enable Cluster aware Updates you must disable Automatic Updates on each HyperV server. You must also install the Cluster Powershell tools Features. Run the following powershell commands to allow the Cluster Manager to restart your HyperV after applying updates
‘Set-NetFirewallRule -Group "@firewallapi.dll,-36751" -Profile Domain -Enabled true’
To verify if your cluster can use Cluster Updates run the Cluster Update awareness tool.
I am very impressed at the functionality of the new hyper-V and I think it will give VMware a good run for the money. With replication for DR and Live migration to and from clusters to standalone machines this VM host platform with allow SMBs to have enterprise features without the costs.
Backing up your Hyper-V cluster with Trilead
It’s been a while since I wrote about any VM backup software (or for that matter ANYTHING) but I wanted to take some time to update my readers on a great little software from the folks at Trilead. I have been using this software since the early version 3 releases and they lost my attention when they began to require the VMware guests be shutdown before they were backed up. Now in version 4.0.37 I noticed that they have added that functionality back along with Hyper-V support! (actually Hyper-v had been added earlier than 4.0.37 but now that I have a Windows 2012 test machine I noticed that it was supported).
They have added a two server restriction so you will only be able to connect to a maximum of two servers but as long as you don’t have more than two nodes in your cluster you can use the Free version.
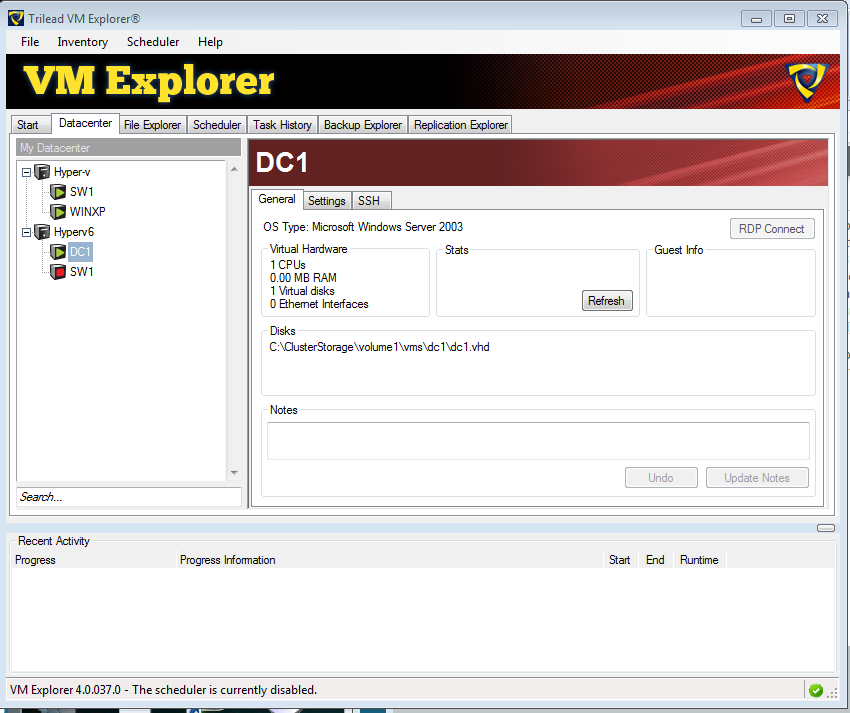
You can backup all of your virtual machines running on your Hyper-V cluster and you can even move them by backing it up and then restoring it to another host (unfortunately you cannot use the replication feature in the free version although who would want to – migrating from one hyper-v to another in a cluster is easy).
You can only perform a full backup on any of these vms but since this is a free product and you can do it while the guest is running I think this software is a great plus you can check them out at http://www.trilead.com/Editions. Where else can you find a software that will allow you to backup a vm – convert it and then import it to a hyper-v cluster that is free?
How to extend your NTFS partition with a vmdk file on ESXi
If you are using a large windows file server on your VMware server you will probably end up with a low disk space warning one day. You could choose to resize a partition in-place there but if something goes wrong you are kinda hosed unless you have a backup. You could copy it but not everyone has that kind of disk space so I like to add an ISCSI datastore to my ESXi server and choose to copy the VM to another datastore first. Then I can try to extend the copied vmdk file using a helper vm. It required a combination of stopping the vm, copying the file, renaming the original vm and bringing the new extended vmdk file online to extend it. Once I verify that everything was working our plan was to then remove the old VM once we were completely sure it was working and to free up the space for other projects.
In ESXi vsphere Shutdown vm
Login to ESXi server using putty
cp /vmfs/volumes/datastore1/WindowsXP /vmfs/volumes/datastore2
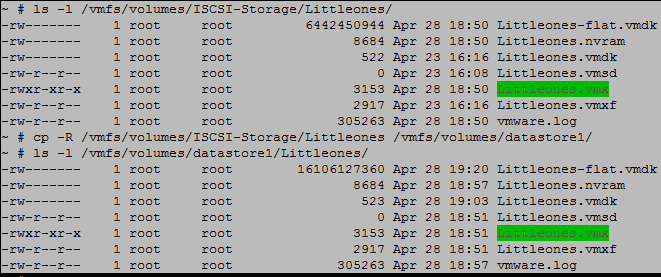
Here we see the copied file is exactly the same at the original
In ESXi vsphere
Rename Old VM to .old (this changes the VM name not the directory name)
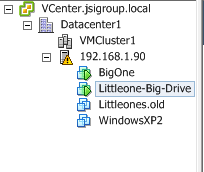
Open helper vm and edit settings, close
Open settings again and increase the hard drive to desired size
Attach copied vmdk file from new datastore directory to existing VM as another drive
In helper OS
Open command prompt and type diskpart
List volume
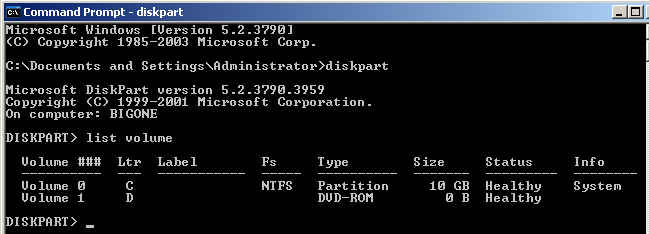
Select volume (new volume number)
extend
quit
In ESXi vsphere
Create new VM (custom) with old name and do not attach hard drive
Add hard drive and use existing vmdk from new datastore directory
When you boot the machine it might do a check disk to resize the partition or after it boots it might need to restart with the new device added.
Verify IP address assignments make changes after initial boot if you do not assign IP automatically using static DHCP addressing.
Reboot and verify operation and once you are satisfied to can delete the old VM.

