Archive
Using VPro with the Kaseya Portal
My Observations of the VPro feature in Kaseya. If you have a machine and would like to enable the VPro feature then review my musings and follow the steps at the end of my post. If you need some help you can contact me and I will review it with you.
(You must be onsite in order to activate this – you will also need a USB key)
I wanted to detail my experience with Kaseya and the VPro feature within it. If you are like me, you might have heard of the feature that Intel has put into their CPUs but that might be all.
I am familiar with remote features like Drac, ILO, etc. in servers but the idea of remote controlling a workstation is so exciting that it opens all sorts of thoughts surrounding management without having to be in front of the keyboard. I especially love the ability of running a disk management tool to help maintain or even fix hard drives that are about to go bad. These tools can run for days and arriving to load it once and asking a local user to tell you when it finishes isn’t always convenient.
Starting with version 6.x, VPro has VNC based firmware installed in the chip – it only needs to be activated in the BIOS or by a special thumb drive – This is where the Intel Activator Wizard comes in. You can configure a standalone password for the AMT to be used by remote control and for any other AMT events. Failing to do so will allow you to connect but the screen is prompting the user for a code that is not visible when you are remoted in. In some cases I have seen versions that cannot be enabled remotely when you detect and then try to enable VPro on certain versions.
You need to have the Intel Management drivers loaded on a machine that has the Kaseya agent installed to be able to detect/enable VPro and it comes from the factory disabled. If the drivers are loaded on an OS and it is running then you can detect and perhaps enable it remotely using Kaseya. The connection topology starts by setting up a vpro proxy (this should be a publically available IP – maybe even one to one NAT) that should be available on the same subnet as the machines you are using with vpro. You map a port through to that vpro proxy machine and it then tries to open the connection to the VPro system on your behalf. You can use any port number you wish – it only requires one however you can only remote one machine at a time.
If you are able to connect through your proxy you may get a screen that asks for a 6 digit passcode. This is the user consent page – it will be asking the user for his/her consent while you try 3 times to ‘guess’ the password. This can be disabled when you use the SCS from above. If you have mistakenly provisioned it using the Kaseya portal you cannot use the AMT configuration utility again – it will state nothing to do. You must disable it in the Kaseya portal and then run the AMT program on a thumb drive on the machine you wish to reprovision in order to have control again.
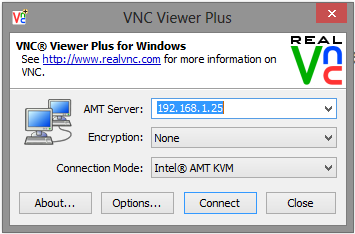
Picture 1
You can download a program called VNC Viewer Plus to verify the connection to the AMT. You should be able to login as admin and use the password you set in the AMT configuration like the picture (attached picture 1).
You must have the ME drivers already installed to use this utility. If you need the Management drivers (your OS did not already have them installed) you should download them from Intel.
The steps I used to activate VPro are as follows;
- Use Cntrl + P to access the MEBX bios when booting up your PC.
- The default password is admin – Set the password to something you can use (you must use a complex password and the remote KVM will only accept 8 characters so please use something similar to p&ssw0rd)
- Boot the computer and insert the thumb drive with the AMT utility expanded onto the drive (http://software.intel.com/sites/default/files/m/d/4/1/d/8/IntelAMT_config_utility_Rev0.5.0.3.zip)

Picture 2
- Run the Activatorscript as Admin and set the password (again if you do not want/need to change it) then enable the following (see attached picture 2)
- After you save the config onto the thumb drive you can reboot the machine with the drive still in it. You should see a screen asking if you want to update the provisioning of the ME (or something similar)
- After choosing ‘Yes’ your AMT should now be enabled in the Kaseya portal.

