Archive
Burp Certificate Magic
Setting up a custom Burp CA certificate for Android
With certificate store improvements to Android, creating a man in the middle scenario for testing has become very hard. When we add to this, the problem of using self-signed certificates from burp, I am not too excited spending time to add certificates over and over again when I have many devices and many testing environments that I use on a daily basis. I wanted to mint my own certificate that I can use to load on a device, a burp instance and a browser once and for all to eliminate the need to repeat it.
This document will serve to show how you can create your own self-signed certificate with a custom Organizational name to install on your Android N device (or higher). This will allow you to identify which CA certificate is installed quickly and easily. This will help you to avoid removing it when you have several ‘Portswigger’ or ‘mitmproxy’ certificates. Use one certificate for all of your devices or for your entire group so you can exchange workstations or devices. We will then show you how to import the certificate to your running burp installation and to an Android instance running Nougat.
Step 1 – Creating your own CA
You will need to create a new certificate with custom attributes. The Organization is used as a name to identify the Certificate on mobile devices under the Trusted Certificate Store. Customizing the org name helps you identify the correct certificate. In our example below – we used “My-Burp-Cert”.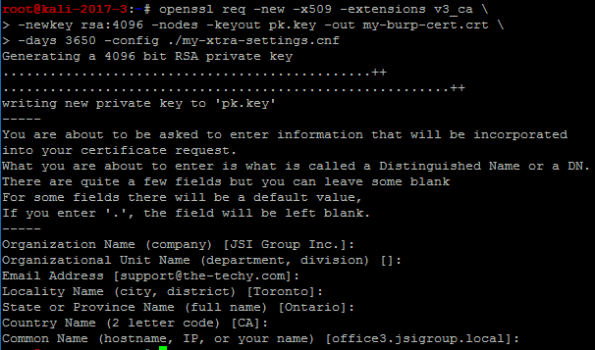
We used the following (below) to make our custom ‘my-xtra-settings.cnf file. You can setup your own files to make it easier to create your certificate but you must add the ‘v3_ca’ section at a minimum. Once you have run the command above, this will produce two files – “my-burp.cert.crt” and “pk.key” – You will need these for the next command.
[ req ]
distinguished_name = req_distinguished_name
[ req_distinguished_name ]
# Variable name Prompt string
#———————- ———————————-
0.organizationName = Organization Name (company)
organizationalUnitName = Organizational Unit Name (department, division)
emailAddress = Email Address
emailAddress_max = 40
localityName = Locality Name (city, district)
stateOrProvinceName = State or Province Name (full name)
countryName = Country Name (2 letter code)
countryName_min = 2
countryName_max = 2
commonName = Common Name (hostname, IP, or your name)
commonName_max = 64
# Default values for the above, for consistency and less typing.
# Variable name Value
#—————————— ——————————
0.organizationName_default = JSI Group Inc.
localityName_default = Toronto
stateOrProvinceName_default = Ontario
countryName_default = CA
commonName_default = office3.jsigroup.local
emailAddress_default = support@the-techy.com
[ v3_ca ]
basicConstraints = critical,CA:TRUE
subjectKeyIdentifier = hash
keyUsage=digitalSignature,nonRepudiation,keyCertSign,cRLSign
extendedKeyUsage=serverAuth,clientAuth
Step 2 – Exporting a PKCS12 file for use with Burp
Export the certificate (with a password) as a p12 file to install into your version of Burp. (You must import a CA file into Burp with a password)
You will import this file (my-burp-cert.p12) into Burp for use as your own Certificate Authority for all versions of Burp that you use. This will help avoid reinstalling Burp certificates in devices and browsers where you perform MitM testing. (you can specify your own CA bundle with mitmproxy by using the ‘–upstream-trusted-ca my_burp-cert.pem’ parameter when you start mitmproxy)
Start Burp and go to the Proxy tab. Click on Options and you can choose to import the certificate and private key using the file ending in ‘p12’ you created in Step 2.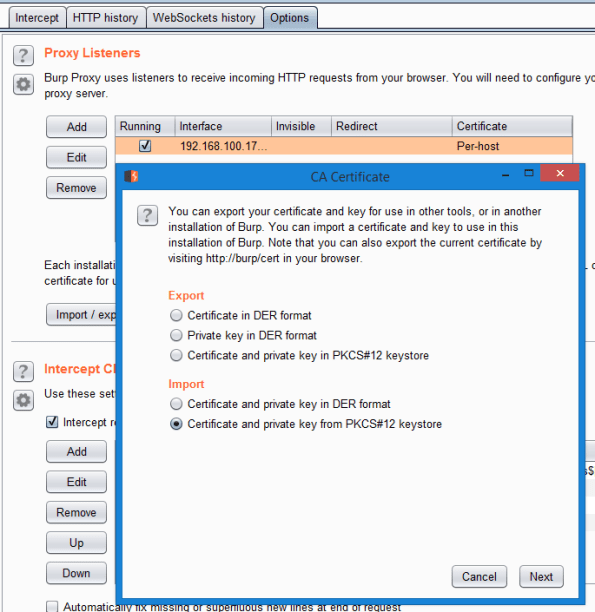
You must navigate to the directory where you stored this file. Remember that you will also need to enter the password you used to export it in Step 2 (by default we executed a command to export using a hard coded password of “12345678”. Don’t forget to change yours to be a strong password).
Step 3 – Installing the CA into your rooted Android Nougat (or higher) device
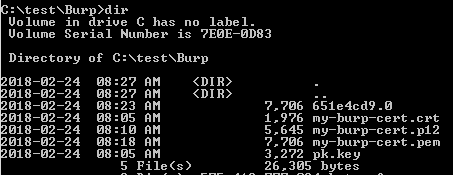
Convert the certificate.p12 into a pem file. This is necessary to use the certificate on a client like Android. (Remember to use a strong password)
Obtain the Subject hash using the following command
Create the CA file for Android using multiple steps
This will leave you with a file that has all of the properties to be loaded on an Android phone and be treated as a system CA certificate.
Step 4 – Install Certificate into Android device
We are now ready to move this file to your Android device and place it in the system storage area of the new Android N (Nougat) O (Oreo) or P (Pineapple) operating systems. We will be using adb to upload the new certificate file.
Open ADB and cd into your directory where you have the burp certificate files prepared in the previous steps.
Copy the certificate to the Android device![]()
Connect to the Android device (Nougat or higher). We are going to use adb to open a shell, elevate to root, remount the system partition using busybox as read/write and then move our root CA file into the system ca store area. Finally we will change the permissions to 644. Last step is to reboot the device.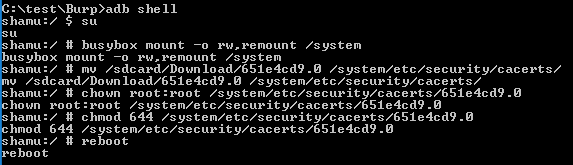
Now you will need to verify that you have it installed.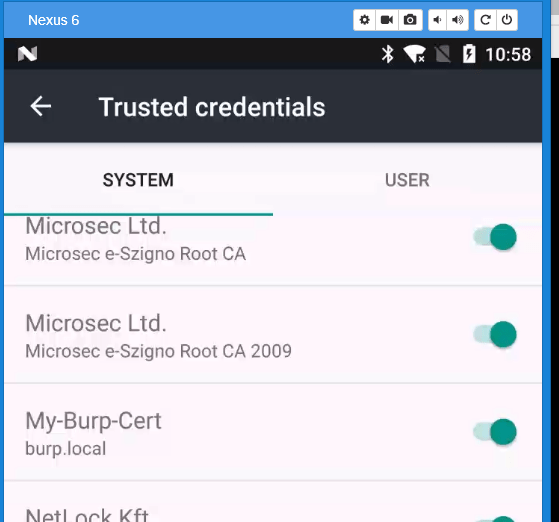
Step 5 – Install Burp cert (.crt) file into Firefox desktop
Now that you have installed the Certificate into a smart phone, you will want to add the same certificate to your list of Trusted CA certificates on your desktop. Firefox uses its own trust store and can be done easily. If you wish to add it so that Chrome or Internet Explorer/Edge will work, please follow the instructions on how to update the Certificate Authorities using MMC.
Open your Firefox and Navigate to about:preferences#privacy. Scroll down to the bottom and click on View Certificates.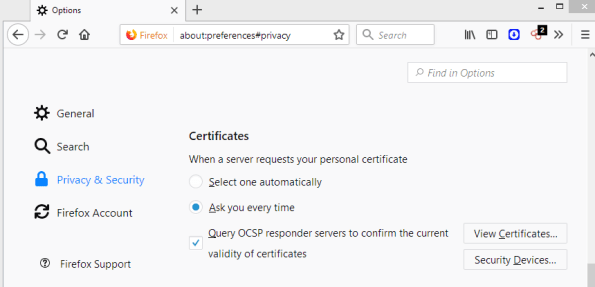
You will need to click on Import and look for your certificate file that ends with ‘crt’. Select it and choose Okay. Be sure to select the ‘This certificate can identify websites’ check box and then click Okay again.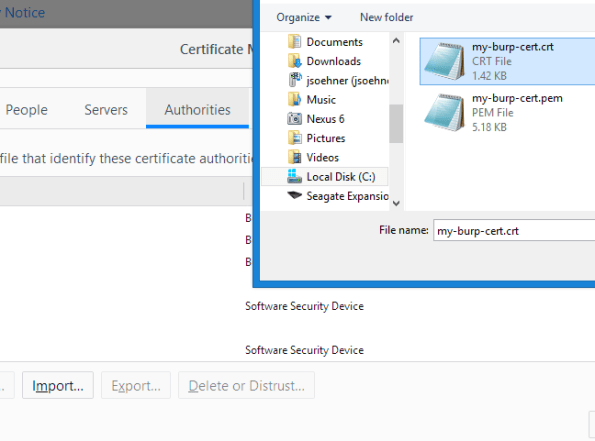
If everything went well you should now see your certificate installed.
Now you can point your browser to use your burp instance asa proxy and you should be able to intercept SSL traffic.
The folks at Google have made it very difficult for testers to configure a testing environment so I hope this means that we will be a little safer. If you have read this far and you are like me, you are probably a crusty old hacker who won’t take no for an answer.
I hope this has helped some of you, I have documented it here for my own edification but feel free to comment if you have a better solution.
Happy Hacking!
