For solutions to these and other problems please contact us at The-Techy.com
Crackenbox2 – how to repurpose your Bitcoin miner
October 29, 2018
Leave a comment
I have been busy at a new job lately and have not had any time to contribute. I found myself so busy in fact that I had purchased some hardware for a new hash killer and did not even open it for several months. I thought this was as good a time as any to create a writeup on how to make your own hash crack computer.
For anyone who was late to the party – Bitcoin mining could be done by creating a computer similar to the one used below but the cost associated with mining your own Bitcoin has gone up making it cost prohibitive. Here is a great way to put those computers to work for you as a security professional / bad guy by cracking passwords.

Using four graphics cards that can be purchased for approx. 400.00 each, any average hacker could build him/herself a password cracking computer that could brute force your passwords.
Firstly, I used a MSI Z170A Motherboard with four PCI-E slots (first one is x8 and the other 3 run x4). This is fine because the real power comes from the GPU on the graphics cards and passes back to the bus at normal speeds. Next we add a i3 (6100) and some Ram (4x4G). We put it in a nice case with 5 x 120mm fans to circulate the heat (the GPUs will create a lot of heat and can shutdown if you don’t remove the heat from the area). Finally we need a power supply to power all four of the GPUs so I purchased a 1300w EVGA all for a total of approx. 3,000.00 (YMMV).
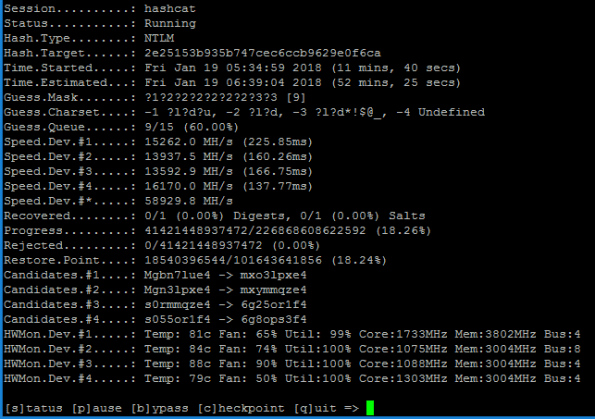
Approaching speeds of almost 60 billion guesses per second, any mortal could destroy a 9 character Windows password that used ANY combination of upper, lower, number or special characters in about an hour.
It’s as easy as using a free, opensource operating system like Ubuntu and loading some additional software to create your own computer that you *could* use to mine Bitcoin but you could probably make more money cracking hashes for profit!
Categories: General
GPYC Certified at last
September 8, 2018
2 comments
Every year or so I try to flex my muscles by attempting to obtain another professional certification and 2018 was hardly different. This was the year that really tested my ability to focus and thank god that is now behind me.
I decided to attempt to become more adept at Python coding (and development in general) having learned just enough to understand that I really don’t fully understand coding. Sure I can understand some constructs like looping, etc. but I never really had the knack for it. After 20+ years in this business I decided I could not improve my skills without learning a bit more about coding.
After, what seemed like a few months and as we were full into Spring, I received confirmation of my company’s intention to fund this years choice of my training curricula ‘Automating Information Security with Python’. It couldn’t have come at a worse time, I just received a promotion and had a large task ahead of me, was approved to visit Black Hat and take a short course in August and had several home improvement projects planned and paid for that needed to begin. If I was going to do this it would take a lot of my free time to avoid failing miserably.
I spent a lot of time, reviewing my course material, asking colleagues and with trial and error, I am happy to report that I have just passed my exam!
For those of you who are on a quest for self-improvement, have wonderful partners who are happy to take a back seat to the endless sacrifice you will surely need to accomplish your goals, I say to you – tell them ‘Thank You!’ because behind every great achievement like this sits a wonderful significant other that has the faith to cheer you on to success.
Categories: General
Do web tokens actually make us safer?
August 18, 2018
Leave a comment
There has been a lot of science that goes into making the web a safe place to do commerce with your desktop computer thanks to Netscape when they created Secure Socket Layers (SSL – 1994). In 2007 we entered the world of the Smartphone thanks in part to Apple (we should leave ‘Simon – 1992’ out of this discussion). It wasn’t until 2015 when the IETF released its vision for sessionless tokens that we found another way to manage a session but is this really more secure?
Current technology utilizes cookies that manage the ‘state’ of your connection in order to prevent you from having to login every time you press a button (imagine how painful that would have been?). We have created many controls that help protect cookies curing transmission and at rest but it still requires users to login to obtain a valid session cookie every time. Mobile users would not be happy so we needed a better solution.
Browser -----------(send login request) ---------------> Server
        < -----------(send cookie) -------------------- (create session)
         ----------------(sends authentication) --------> (validate)
        <-------------------(send response) -----------
A JSON Web token is similar to a session cookie and in order to protect them, we decided to create three types of security with it. First option is no security at all (null) and there is nothing secure about that right? These were created to manage other types of data exchange where other security controls were used.
The second type can use a signature to be sure that it cannot be modified. (There is also a third type that uses public key encryption and is preferred but can add significant overhead to the developer and is not widely adopted yet). Lets focus on the second type.
Browser -----------(send login request) ---------------> Server
(first use) <---------(send JWT) -------------------- (create JWT)
(if exist) -------------(sends authentication) -------> (validate sig)
        <-------------------(send response) -----------  (valid user)
Ensuring the integrity of the message can be done by signing the JWT with a message authentication hash which can be created by adding up all the data and hashing it with a secret passphrase. If the developer does not use a strong passphrase and we can guess it, an attacker (that’s me!) can modify the message. Cracking that hash and determining the secret that was used is a lot like guessing what password you use to login. We can use the same method we use to crack your password to determine what secret was used to create the hash for your signature!
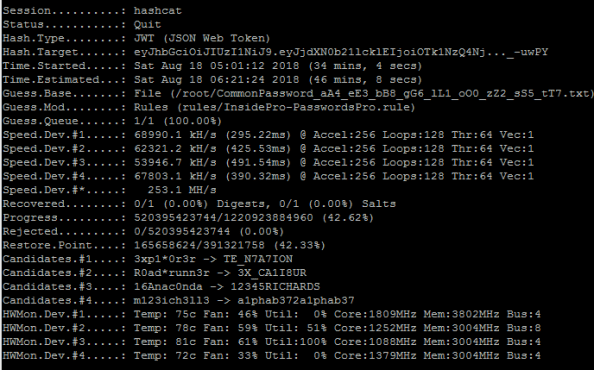
Cracking JWT using hashcat with 4 GPU
For a mere 3,000 dollars, I built a computer that can guess the secret that was used to create the hash at speeds of 250 million guesses per second. If the developer does not choose a good long password, they cannot expect to have a high level of trust that users are, who they think they are, when they login.
Now, because the token is transmitted to the client and then accepted whenever the connection is made, the server has no way of knowing that I am not you (after I capture your token or after I compromise your device and steal the token). Using tokens that live on the (untrusted) client is far riskier that using cookies that are stored on your (supposedly secure) server.
Don’t get me wrong, I think the advantages of tokens over cookies helps offset the risk but my lesson here is that we must ensure the integrity of our security controls when it comes to using JWT. They solve many problems that traditional session management has including;
- cookies can be disabled (such as 3rd party cookies across domains)
- cookies are per device whereas tokens can work between your desktop and your mobile device to create a seamless experience
- memory issues server side for cookies but tokens reside on the client
With great power comes great responsibility so we must take additional steps when deciding to use tokens in place of cookies. Our infrastructure will be slow to provide protection for these as they did for cookies so the responsibility is on the app developer to use strong passphrases and to implement encryption when using sensitive claims with the tokens.
In short, if you read the RFC for JWT, you will find the following statement;
The contents of a JWT cannot be relied upon in a trust decision unless
its contents have been cryptographically secured and bound to the
context necessary for the trust decision.  In particular, the key(s)
used to sign and/or encrypt the JWT will typically need to verifiably
be under the control of the party identified as the issuer of the JWT.
This means that your developers must be following best practices when choosing their pass phrases. A good rule of thumb is to use one bit of entropy for every byte data you wish to protect. If you are using 256 bytes of a payload you should consider making your pass phrase, 32 bytes long. You should also carefully consider ‘pass phrase/key’ rotation and token expiry policies. Session hijacking is one of the most important tools in the hackers toolbox and is easily executed if session management is not done right!
Categories: General
Happy TLS New Year
July 1, 2018
Leave a comment
Its here! – The new world of Transport Layer Security (read more)
July 1 2018 marks the birth of a more secure world for users of credit cards. Almost every vendor, merchant and client of the Payment Card Industry (PCI) should now be using TLS 1.2 without RSA encryption in order to avoid attacks being leverage against your implementations of secure sockets.
If you have migrated away from DHE/3DES/CBC/RSA/TLS1-1.1 in favour of TLS 1.2 using Elliptic curve cryptography you might already be missing attacks like DROWN, BEAST, Lucky Thirteen, Logjam and even the stealthy ROBOT but you can rest assured that you have a secure method of connecting. Our next milestone will be the adoption of TLS 1.3 which can prevent attackers all together.
If you are a large and slow moving enterprise, you might have decided to utilize some customized patches from the likes of F5, Fortinet. You may also be hoping that content delivery networks like CloudFlare or Akamai are going help thwart these attacks. Managing these customized patches can contribute to security burnout or worse, you could be vulnerable to one or more of these attacks.
As we get ready for the second half of 2018, cvedetails already shows us with almost 60% of last years total amount and we have surpassed any other year in the past 15 years of reporting. Lets end this year right by removing bad cipher suites in all of our web services.
Categories: General
Key services for encryption?
April 16, 2018
Leave a comment
In an effort to ensure that hackers do not load vulnerable versions of firmware, Apple uses a key service to enable testing versions of their newest firmware. This affords users the ability to try out the new firmware while they collect statistics, crash logs and other metrics. After a period of time when they are certain all of the platforms have stabilized, they remove the signing key for the older version to prevent users from upgrading/downgrading to that version.
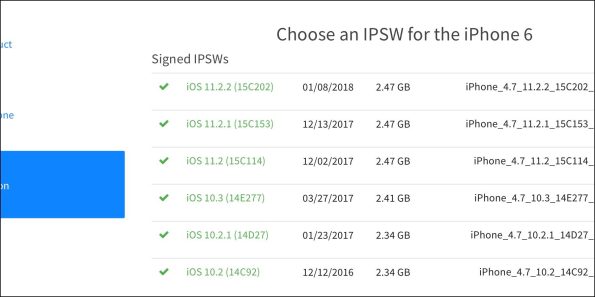
Earlier this year, a mistake was made that allowed several older versions to be ‘available’ so that users who wanted to downgrade to older vulnerable versions could do it for a short period of time. The mistake was reversed pretty easily by removing those signatures from the public facing server.
Imagine if you could use this type of service for encryption? Encrypt your entire hard drive with a key from a remote system so that each time you need to boot it, you fetch the key and if available, you continue to boot. If it is not available, perhaps because the image was stolen and you choose to remove the signing key, anyone who came across this image would not be able to decrypt it? Imaging using this in a highly volatile infrastructure like the cloud?
Well, the fine folks from RedHat have now done this with the Linux Unified Key Setup (LUKS) system. With RHEL 7.5 there is a new service called Network Bound Disk Encryption (NBDE) that will auto magically mount your LUKS enabled root partitions using a third party key service. Loose your disk image and you don’t have to worry about someone else booting it up and/or mounting and decrypting the data on it.
Now that is smart! – https://rhelblog.redhat.com/tag/nbde/
Categories: General
Burp Certificate Magic
February 25, 2018
Leave a comment
Setting up a custom Burp CA certificate for Android
With certificate store improvements to Android, creating a man in the middle scenario for testing has become very hard. When we add to this, the problem of using self-signed certificates from burp, I am not too excited spending time to add certificates over and over again when I have many devices and many testing environments that I use on a daily basis. I wanted to mint my own certificate that I can use to load on a device, a burp instance and a browser once and for all to eliminate the need to repeat it.
This document will serve to show how you can create your own self-signed certificate with a custom Organizational name to install on your Android N device (or higher). This will allow you to identify which CA certificate is installed quickly and easily. This will help you to avoid removing it when you have several ‘Portswigger’ or ‘mitmproxy’ certificates. Use one certificate for all of your devices or for your entire group so you can exchange workstations or devices. We will then show you how to import the certificate to your running burp installation and to an Android instance running Nougat.
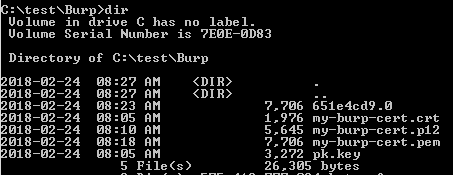
Step 1 – Creating your own CA
You will need to create a new certificate with custom attributes. The Organization is used as a name to identify the Certificate on mobile devices under the Trusted Certificate Store. Customizing the org name helps you identify the correct certificate. In our example below – we used “My-Burp-Cert”.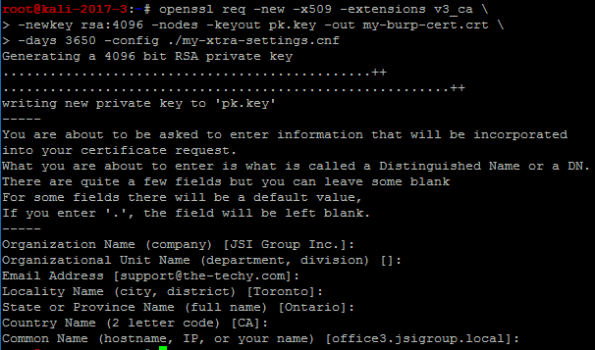
We used the following (below) to make our custom ‘my-xtra-settings.cnf file. You can setup your own files to make it easier to create your certificate but you must add the ‘v3_ca’ section at a minimum. Once you have run the command above, this will produce two files – “my-burp.cert.crt” and “pk.key” – You will need these for the next command.
[ req ]
distinguished_name = req_distinguished_name
[ req_distinguished_name ]
# Variable name Prompt string
#———————- ———————————-
0.organizationName = Organization Name (company)
organizationalUnitName = Organizational Unit Name (department, division)
emailAddress = Email Address
emailAddress_max = 40
localityName = Locality Name (city, district)
stateOrProvinceName = State or Province Name (full name)
countryName = Country Name (2 letter code)
countryName_min = 2
countryName_max = 2
commonName = Common Name (hostname, IP, or your name)
commonName_max = 64
# Default values for the above, for consistency and less typing.
# Variable name Value
#—————————— ——————————
0.organizationName_default = JSI Group Inc.
localityName_default = Toronto
stateOrProvinceName_default = Ontario
countryName_default = CA
commonName_default = office3.jsigroup.local
emailAddress_default = support@the-techy.com
[ v3_ca ]
basicConstraints = critical,CA:TRUE
subjectKeyIdentifier = hash
keyUsage=digitalSignature,nonRepudiation,keyCertSign,cRLSign
extendedKeyUsage=serverAuth,clientAuth
Step 2 – Exporting a PKCS12 file for use with Burp
Export the certificate (with a password) as a p12 file to install into your version of Burp. (You must import a CA file into Burp with a password)
You will import this file (my-burp-cert.p12) into Burp for use as your own Certificate Authority for all versions of Burp that you use. This will help avoid reinstalling Burp certificates in devices and browsers where you perform MitM testing. (you can specify your own CA bundle with mitmproxy by using the ‘–upstream-trusted-ca my_burp-cert.pem’ parameter when you start mitmproxy)
Start Burp and go to the Proxy tab. Click on Options and you can choose to import the certificate and private key using the file ending in ‘p12’ you created in Step 2.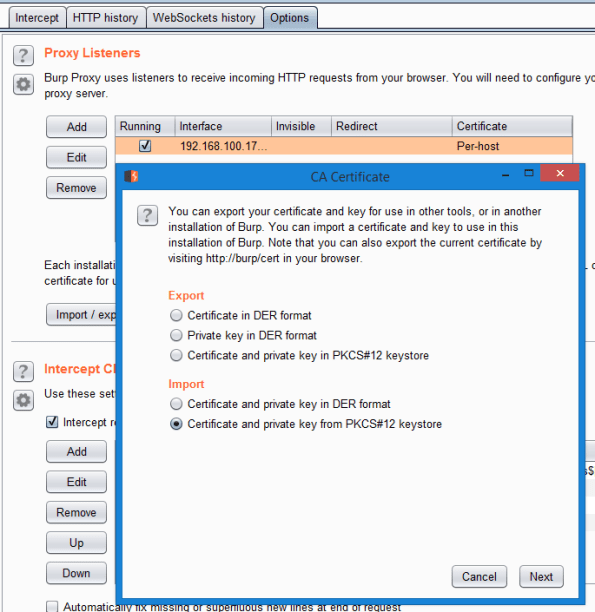
You must navigate to the directory where you stored this file. Remember that you will also need to enter the password you used to export it in Step 2 (by default we executed a command to export using a hard coded password of “12345678”. Don’t forget to change yours to be a strong password).
Step 3 – Installing the CA into your rooted Android Nougat (or higher) device
Convert the certificate.p12 into a pem file. This is necessary to use the certificate on a client like Android. (Remember to use a strong password)
Obtain the Subject hash using the following command
Create the CA file for Android using multiple steps
This will leave you with a file that has all of the properties to be loaded on an Android phone and be treated as a system CA certificate.
Step 4 – Install Certificate into Android device
We are now ready to move this file to your Android device and place it in the system storage area of the new Android N (Nougat) O (Oreo) or P (Pineapple) operating systems. We will be using adb to upload the new certificate file.
Open ADB and cd into your directory where you have the burp certificate files prepared in the previous steps.
Copy the certificate to the Android device![]()
Connect to the Android device (Nougat or higher). We are going to use adb to open a shell, elevate to root, remount the system partition using busybox as read/write and then move our root CA file into the system ca store area. Finally we will change the permissions to 644. Last step is to reboot the device.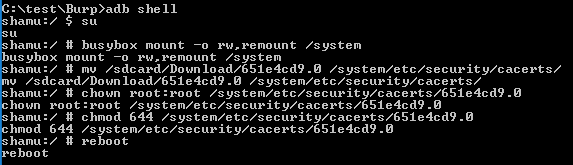
Now you will need to verify that you have it installed.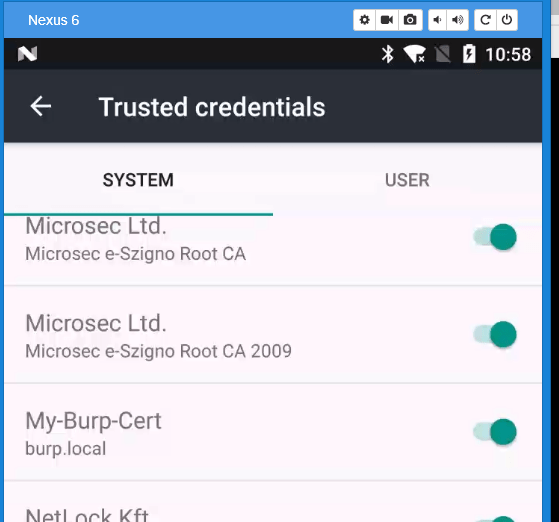
Step 5 – Install Burp cert (.crt) file into Firefox desktop
Now that you have installed the Certificate into a smart phone, you will want to add the same certificate to your list of Trusted CA certificates on your desktop. Firefox uses its own trust store and can be done easily. If you wish to add it so that Chrome or Internet Explorer/Edge will work, please follow the instructions on how to update the Certificate Authorities using MMC.
Open your Firefox and Navigate to about:preferences#privacy. Scroll down to the bottom and click on View Certificates.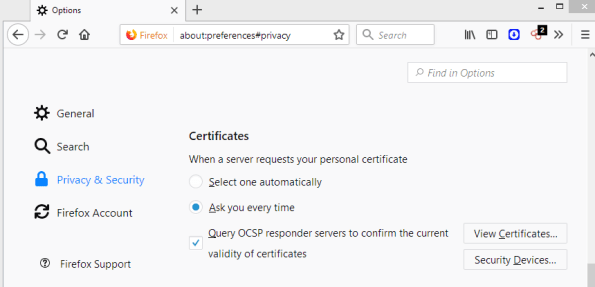
You will need to click on Import and look for your certificate file that ends with ‘crt’. Select it and choose Okay. Be sure to select the ‘This certificate can identify websites’ check box and then click Okay again.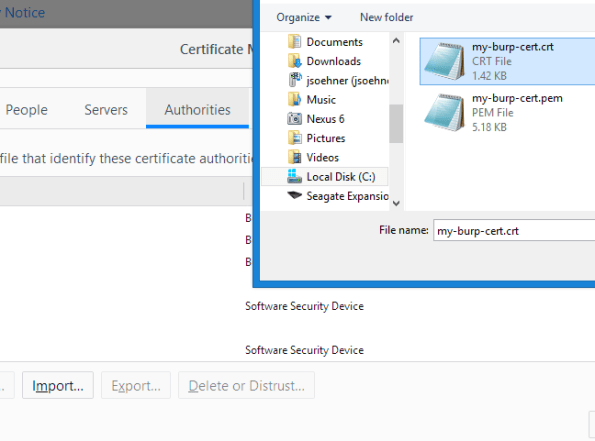
If everything went well you should now see your certificate installed.
Now you can point your browser to use your burp instance asa proxy and you should be able to intercept SSL traffic.
The folks at Google have made it very difficult for testers to configure a testing environment so I hope this means that we will be a little safer. If you have read this far and you are like me, you are probably a crusty old hacker who won’t take no for an answer.
I hope this has helped some of you, I have documented it here for my own edification but feel free to comment if you have a better solution.
Happy Hacking!
Categories: General
Bruteforce your identity from a single CC number?
December 8, 2016
Leave a comment
In this article and the accompanying white paper, the details that hackers use to take a skimmed or stolen credit card number and work backwards are revealed. They start to figure out your expiry first and then your postal code, CV code and finally your billing address to make purchases as you.
Mastercard holders are winners here because the verification system they use is not vulnerable but visa card holders beware.
Fortunately for card holders, they are indemnified against fraudulent purchases but if you only have one card you may be stuck waiting for a replacement.
https://www.schneier.com/blog/archives/2016/12/guessing_credit.html
Categories: General
Malvertizing just got a whole lot smarter.
December 7, 2016
Leave a comment
With a stroke of genius, a new approach allows hackers to determine if you are running IE without up to date antivirus and then using several flash vulnerabilities, attack your pc using steganography.
It’s like a ninja sneaking up on you, deadly, virtually undetectable and very smart.
Categories: General
Thinking of using your debit card at the pump, think again
December 2, 2016
Leave a comment
Visa Delays Chip Deadline for Pumps To 2020 https://krebsonsecurity.com/2016/12/visa-delays-chip-deadline-for-pumps-to-2020/
Caving to the Convenience store lobby, Visa has delayed making the move to chip and pin which can make your debit cards huge win in a skimmer. If you are at a pump that does not use a chip reader, DO NOT USE YOUR DEBIT CARD!
Categories: General
